|
REED SWITCH |
| INSTALLATION GUIDELINES |
|
REED SWITCH |
| INSTALLATION GUIDELINES |
![]()
Magnetic proximity switches, or reed switches, take advantage of an "H.O." type slot car’s unique properties, traction magnets, when used in conjunction with a lap counter. A reed switch contains two parallel arms that are normally separated but make contact when a magnetic field becomes present. In this case, a slot car’s traction magnets traveling overhead. Optimal reed switch location is right inside the track rail and as close to the path of a car’s traction magnets as possible. Also, reed switch placement on a track layout should be somewhere that a car is not likely to de-slot such as at the end of a long straightaway for example. All 21st Century Tracks Designer Series Track Kits are configured with pre-routed sockets designed expressly for the reed switches included in the kit. Those adapting reed switches to plastic track sections must first create a socket so that the reed switches will fit flush with the track surface. |
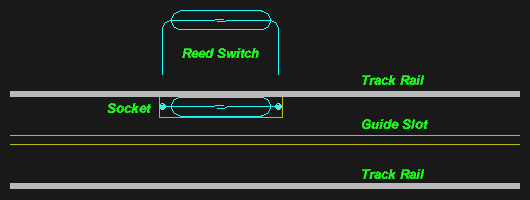
| Trial fit the reed
switches in their sockets. They should drop in freely with the reeds pointing
perpendicular to the track surface or straight up at the ceiling. Line the socket
with clear silicone and position the reed switch so that it is flush with the track
surface. Remove any excess silicone from the track surface and allow to dry.
Under normal circumstances reed switches are maintenance free, but do not use a permanent
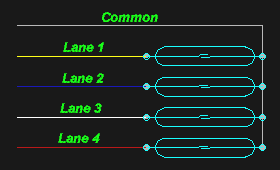
adhesive to install them in the unlikely event of replacement. Commercial lap counter systems usually require one side of the reed switch to be wired directly to its corresponding lane terminal with the other side of all reed switches connected together in common as shown below. Otherwise, for single digital counters each reed switch must be wired individually. |
![]()
Copyright © 1994-2013 21st Century Tracks - All Rights Reserved