|
DRAG STRIP KIT ASSEMBLY |
|
|
DRAG STRIP KIT ASSEMBLY |
| Platform Base Preparation | Formica Laminate Installation | Track Rail Preparation |
| Track Rail Installation | Shutdown Installation | Final Assembly |
I. PLATFORM BASE PREPARATION A. The flatter the platform, the smoother the racing surface. Whether plywood or particle board, the platform base must be pre-sanded as evenly and consistently as possible to ensure perfect track alignment overall ease of construction. Any belt, disc or hand sanding should be accompanied by a carpenter's level, T-square or other known straight edge for reference. Make sure that there is no paint, varnish, grease or dirt on any area of the platform where the drag strip would be bonded. B. Measure twice, cut once. Lay all the track sections in place, pencil trace their outlines for reference, and mark the location of any access cutouts that will be required to accommodate power taps and/or timing sensors. A sabre saw with a fine blade is best for the access cutouts, using a pilot hole drilled within the cutout area that is large enough for the saw blade. |
II. FORMICA LAMINATE INSTALLATION A. Fabricate a series of track section alignment pieces using .062" piano wire, brass tubing or other soft metal stock. Two will be needed to locate the guide slots of each section. These pieces should be about three inches long and sanded undersized to ensure that they are easily removed. B. The drag strip sections are consecutively numbered from the starting line and should be installed in numerical order. Trial fit all track sections in their intended location on the platform, including alignment pieces to ensure proper positioning. Then remove the track sections from the platform. Prepare paper shims (tissue paper, newspaper, or plain paper in order of thickness), to be soaked with glue and put under track sections as necessary to make sure that adjoining track sections butt in a smooth and even racing surface. Run the shims as far back from the seam as possible to ensure that each track section butts squarely. C. Make sure both the platform and the track sections are clean and dry. Using carpenter's wood glue, liberally apply to within an inch of the track section's outline. Working time is usually 10-20 minutes with a 24 hour total drying time. Initially, the wet glue may be slippery enough to make securing a section difficult. In this case, use soft jawed clamps or dead weight (such as bricks or cinder blocks). Use the alignment pieces to locate each subsequent track section by dropping one freely into each guide slot across the joint. Make sure that no previously installed track sections have shifted in the mean time. D. Using dead weight and/or clamps as necessary, apply evenly distributed heavy downward pressure to the entire track layout, making sure that the racing surface is protected from incidental scratches or indentations during pressure application. Double check each track section's location and its alignment with other sections as pressure is applied, and that the entire track layout is flat against the platform. Excess glue can be removed with a sponge and water. Allow to dry completely. Use fine grit sand paper folded in half to carefully remove any debris from slots. E. Once the drag strip is permanently in place, seal all slots and any other exposed wood surfaces with clear commercial wood sanding sealer. Follow the manufacturer's application instructions carefully. Do not be surprised if the Formica laminate distorts as the sealer soaks into the substrate. As a pre-manufactured laminate, the Formica will return to its original condition once all moisture has evaporated. This important step will not only ensure maximum epoxy adhesion when installing the rails but will also provide long term protection from thermal expansion or shrinkage, rot, mold, and mildew. |
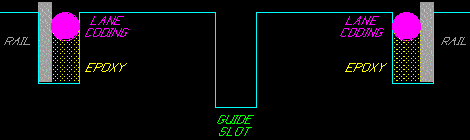
III. TRACK RAIL PREPARATION A. Be extremely careful unrolling and handling the steel track rail to avoid producing any crimps or bends that will make installation much more difficult. As a coil, the rail must be treated as such. Its soft temper makes is it easy to bend into place around turns but requires delicate handling. B. With a clean rag and Naptha or similar cleaner, wipe all the track rail and lane coding clean of any excess oil or dirt to maximize adhesion when installed. Tie loops around the coils of both rail and lane coding to maintain control over uncoiling during later installation. C. The power taps provided must be trimmed square, deburred, and beveled at one end to provide maximum clearance for the lane coding. If a cover plate is to be used, trim the power taps to their desired length at this point. Electrical wire can also be used in the same manner as an option. D. Using a Dremel Moto Tool and sanding drum, stone wheel or similar, completely de-burr and finish off one good end of all rails for both the drag strip and shutdown. Since the track rail is located at the outside edge of its respective slot, the power taps always face inward toward the guide slot. Also, the power taps should be soldered on the "smooth" side of each rail, with the smooth side also facing the guide slot. Lay each drag strip rail in its respective slot with the good end at the finish line. Using a permanent marker, measure and mark the location of all power taps. Don't mistake the left side rail for the right side rail or vice versa. E. Using paste flux and 60/40 lead-tin solder, solder the beveled end of the power taps to the bottom half only of each track rail where previously marked. Room must be left at the top half of the rail to allow the packing to sit flush with the track surface. Make sure that the power tap is perpendicular to the track rail. Be sure to use ample solder and heat to achieve a well sweated solder joint. Grind any excess solder from the top half of all taps as necessary. Clean any flux residue thoroughly to avoid corrosion. F. Test fit the track rail with packing at the power tap to ensure that it will fit properly. |
IV. DRAG STRIP RAIL INSTALLATION A. Load a tube of epoxy into the applicator gun and attach the premixing extension and needle tip. Don't squeeze the trigger until you are ready to begin. The epoxy's working time is about 60 minutes with a curing time of 24 hours. It is best to use the epoxy at room temperature. Warmer temperatures allow easier flow but faster curing, while colder temperatures may cause the epoxy to bead up and cure slower. Plan on being able to install and cleanup approximately 30' to 60' of track rail per hour. While the applicator system is precise, it is also delicate. Too much downward pressure during use can cause leaks. Use firm trigger pressure but a light touch at a low angle in guiding the applicator through the rail slots. Change pre-mixer/tip whenever the epoxy stops flowing freely through the system. Lay out all materials, tools, and supplies in advance to facilitate not only installation but cleanup as well. Once epoxy is fed into the pre-mixer the clock starts slowly ticking. Change pre-mixer and tip as the epoxy nears the end of its working time. B. Two people working in tandem can help minimize total installation time. One person can both uncoil rail and packing beforehand and clean up epoxy afterwards allowing the other to focus solely on precise installation of both rail and packing. The rail should not be uncoiled too far in advance (to avoid kinking and shifting in the slot). Also, the packing may tend to twist as it is worked into place and any untwisting is easier if the uncoiled length is shorter. Odorless paint thinner should be used to dilute any excess epoxy and wiped up with plenty of lint-free rags as soon after rail/packing installation as possible. Use plenty of thinner to wipe the epoxy up rather than merely smear it around. Do not apply any excessive pressure to the freshly installed rail/packing when wiping up excess epoxy!! Final rail height can be easily affected if extra care is not taken to maintain a light touch during cleanup. Take regular rail height measurements using dial calipers and inspect the packing frequently as installation and cleanup progresses to ensure that where it is put is where it stays. If it isn't then stop immediately, retrace your steps, and begin again. C. Lay a solid bead of epoxy into the bottom of the first rail slot from the finish line back to the beginning of the drag strip. A second application may be necessary if the epoxy soaks into the Formica laminate's substrate material. It is usually better to apply extra epoxy (subject to all the above) than to use too little. From the finish line, lay the track rail into the slot as far as it will lay naturally. Place the Railsetter on top of the rail at any chosen starting point and work the packing flush with the track surface using the plastic finger. The packing belongs in the inside, between the rail and the guide slot. The Railsetter is designed to magnetically hold the rail at an approximate .015" height during rail installation. Clean the Railsetter frequently with acetone to ensure proper operation. Move the Railsetter slowly ahead and slide the lane coding into place with the plastic finger directly behind the Railsetter. Keep the lane coding slightly tensioned so that it will still lay straight even if the rail slot runs wider than expected. Hold the plastic finger at as low an angle as possible when installing the lane coding to minimize the possibility of pushing the rail down with it. Keep the pencil's blade sharp by fine block sanding. As you work the packing into place the epoxy should try to ooze out from the slot. If it doesn't, apply more epoxy. If the slot becomes "flooded" and the epoxy's own pressure makes installation more difficult, clean up the excess immediately and use less.
Work slowly and carefully to ensure consistency should anything shift either during installation or cleanup. The purpose of the packing is to hold the rail in place until the epoxy cures. Should any rail settle, go back immediately to reset the rail within range. High spots should also be reset to avoid the need for subsequent grinding. D. Once you reach the drag strip's beginning, make sure both the rail and packing are cut and trimmed flush. E. Complete the above process for the other drag strip rails. |
V. SHUTDOWN RAIL INSTALLATION A. Lay a continuous bead of epoxy into the bottom of the first shutdown rail slot from the finish line out to the end of the shutdown. Lay three pieces of shutdown rail in the slot with the good end .032" away from the drag strip rail at the finish line. This gap is important as no electrical current is desired in the shutdown. B. Apply even pressure to the rails as they are worked into place along the shutdown from the finish line to the end of the shutdown. OPTIONAL: Tapering the shutdown rail upward from the finish line to the end may increase the shutdown's overall effectiveness. C. When within a few feet of the end of the shutdown, cut and trim the shutdown rails flush with the end of the shutdown. Continue to work the remaining shutdown rails into place. D. Complete the above process for the other three shutdown rail slots. Change pre-mixer and tip as the epoxy nears the end of its working time. Use Naptha or similar cleaner and a clean, lint free rag to remove any excess epoxy prior to curing. E. Apply pressure over the entire shutdown while the epoxy cures to ensure that all shutdown rails are as even as possible. |
VI. FINAL ASSEMBLY A. Solder electrical connections to power taps using 60/40 lead-tin solder and paste flux. Extra care must be taken that the power tap does not get too hot and melt the solder joint at the rail. B. Install timing sensors per the manufacturer's instructions. OPTIONAL: C. If the packing is not flush with the track's surface, use a sharp X-Acto knife to pick the packing out of the rail slot at some point and lift it out as necessary. Make sure no dried epoxy remains along either the rail or the slot's inner wall. Also, make sure that the existing packing has clean cut ends. Repeat original installation process, butting the replacement packing flush against the original packing. D. Rail height is based on the average of its total useful life (say 10 years or more). As a new track, you should expect only slight wear over time. Once rail is set too low it is very difficult to raise it back up! Since the stock ride height for commercially available "H.O." type slot cars is .040", a target rail height of .015" is provided with the Railsetter. If the rail is too low, use a sharp X-Acto knife to pick the packing out of the rail slot near the low rail and lift it out as necessary. Be extremely careful digging out all dried epoxy so as not to damage the track surface. Finally, run the knife along the track rail's back side to break it loose. Once the epoxy's bond is broken, using the Railsetter turned upside down should lift the rail for resetting. Follow the above guidelines for repairing packing. Repairs otherwise follow the original installation process. If rail the rail height is too high, use a feeler gauge as a guide and run down each lane's rails length-wise with a diamond whetstone. Verify the desired final height by taking frequent measurements with dial calipers. Even though the soft tempered rail is specifically designed to facilitate finishing, all necessary care must be taken when grinding the rails to their final height. Maintain consistent pressure with a steady hand to not only avoid over grinding but damage to the racing surface as well. Diamond whetstones are available from Traver's Tool Co., Inc. at 1-800-221-0270 among other tool suppliers. Order #53-810-100 (fine) or #53-810-101 (coarse). E. Acetone can be used with some success to remove dried epoxy from the track's surface, but only at the risk of damaging the packing. F. Any incidental surface nicks or scratches that may occur during installation can often be removed using automotive rubbing compound mixed with penetrating oil. Be careful not to rub too hard or too deeply. The shine can often be restored using polishing compound for plastics and a buffing wheel. |
![]()
![]()
Copyright © 1994-2013 21st Century Tracks - All Rights Reserved