
Custom Track Assembly Guidelines
Custom Track
Assembly Guidelines
 |
 |
![]()
|
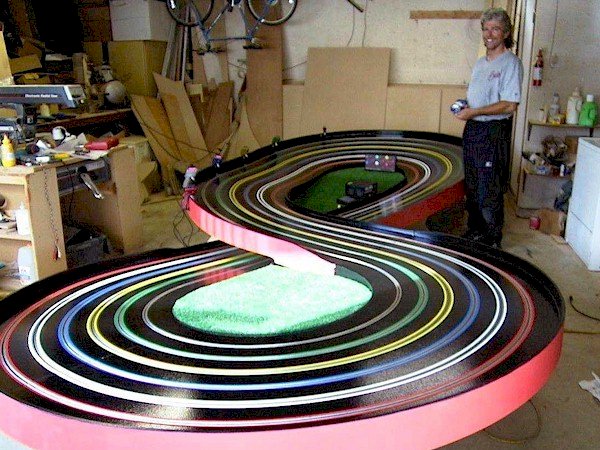
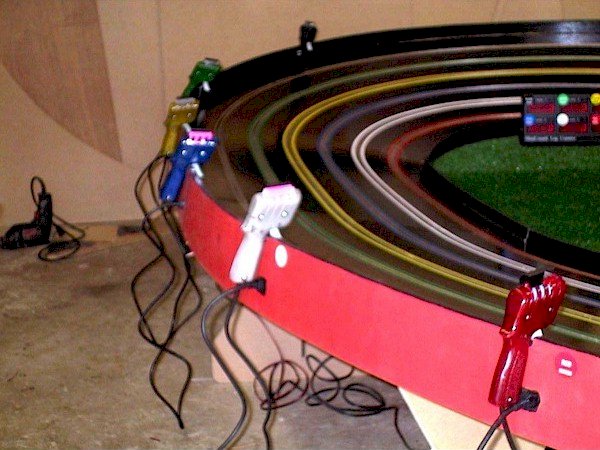
TRACK ASSEMBLY First lay out the pieces by standing them on their sides if you’re on level ground. Most should stand on their own other that the banked turn and perhaps the bridge section. Attach legs (they’re numbered and bolt to underside of track section with corresponding numbers) and tighten with 9/16 wrench. After you attach legs each section (other than the smallest straight piece) will stand on their own. Bolt sections together but do not tighten until all section are bolted together. The bridge section will be the last piece to go together and specifically the joint between legs 1 & 11. There will be an offset of about 4-6 inches that must be pulled over to get the bolt through. If it’s difficult even when aligned properly try pushing down on the top of the section joint thereby straightening the top of the section, which will allow the bolt easier passage through. (This is not a delicate procedure; I often pull, jerk and shove to get them together.) Once all sections are loosely bolted you may tighten all bolts. Once the track is together its time for the electronics. Lay lap counter on bank section (or you may use it in the donut section) and run wires to appropriate connectors under the track. (The 9 pin connector for the lap counter is marked under the longest straight section) The lap counter power cord must be attached to 110 volt and the doorbell button should be placed near the lap counter "dead-strip" section. I use a small box or plastic counter type unit to place this, the power supply and, Public Address Amplifier and microphone on…a "command center" if you will. You may however, place all on the grass infield as I did in the photo on my web site. Put grass infield pieces in place. Now take the relay panel (item with lots of wire wrapped around it) and plug 3-prong end into receptacle at underside of small straight section. Attach stripped ends of wire to power supply with red striped wire to red post on power supply. Attach phone cord to LCD Time. Plug power supply and Lap Counter power supply to AC outlet. Plug controllers into appropriate places at "drivers panel" and hang by triggers on sidewall. "Spray Glue" the turns (see Track Maintenance). Place cars on appropriate colored lanes. Turn on power supply to about 9 volts. Press ON button on LCD Time, go to any controller and try it out! The LCD Time has many functions, read the instructional, as well as all other instructions. |
![]()
|
RACER INSTRUCTIONS FOR FIGURE 8 TRACK Most of your racers will not know what to do. Here is what I say before starting each race: Make sure all racers know what color car they have. Tell them to make sure they keep their eyes on their car AT ALL TIMES. If they lose sight of their car, let go of the trigger until they determine where their car is! They should test their triggers out to get the feel of the trigger movement. Tell them to determine where half trigger is. Half trigger is how they should start as they will be starting the race by going into the "donut" the hardest turn on the track. Once their car is entering the bridge area they can go full speed all the way around the banked turn but keeping their eyes on their car as they see it approach the bridge area they MUST LET GO OF THE TRIGGER ALL THE WAY! The cars are big and heavy and they coast for quite a ways and by letting go of the trigger they can slow down enough to keep from crashing as they enter the donut (AKA "dead-mans turn"!) The quicker they let go of the trigger, the better they will get through the turn! Many will lazily let go or let go part way and thus will carry too much speed into the turn and will crash. Note that all lanes are different and that the red lane will be much easier than black, which will be the hardest lane at the donut turn. If they have a problem crashing they should be able to "Cruise" at half trigger all the way around the track. Set the timer to 2 minutes and let them know when you press power by saying GO! You should station yourself or help at the donut turn to "turn marshal" (put crashed or de-slotted cars back in slot at appropriate lane). If I have several racers who are having a problem crashing too mush I’ll hit the HOLD-OFF button on the LCD Time which will hold the remaining time but turn off track power. I’ll then remind them of the instructional. Many times the racer will be watching the wrong car or they think they’re letting off the trigger when they’re really not letting off the trigger properly. Remember all lanes are different and require slightly different driving techniques. Notes: At first I thought many kids crashed purposefully and by no means do I allow this to become a part of the race. Most times the problems are that they just don’t let off the trigger properly or they lose track of their car. This is the first time I’ve written these notes down and I’ll continue to review them and keep you advised of any changes or refinements. Now that I am going over it, I know it sounds complicated. It can be much less complicated but I’m very particular about this being a learning experience as well as fun! |
![]()
|
TOOL KIT The following is a list of items included in your tool kit:
|
![]()